Sunday, October 9, 2011

Board and Batten Go! or The Master Bath is finally sorta finish..

The Twin Ninja and I have been living in this Townhome for almost 6 years now. It’s our first home purchase. We hope to one day move to a bigger house with its own yard and no neighbors connected to us. Preferably a farm house, but beggars can’t be choosy so a nice home on a nice lot will do as well.

The time that we have been here, I haven’t really touched my bathroom or the bedroom. It’s been the same builder antique white that is everywhere for a long time. My Sis worked on her bathroom and bedroom awhile back and both look awesome now. Especially her bathroom, Good job Sis!

So I finally decided I need to do something too. I painted my bathroom several months ago but was still deciding on what else to do. Painting it helped a lot but I wanted my bathroom to have some character. I scoured the internet for ideas and fell in love with a wall technique called “Board and Batten”. I searched and searched for this B&B to get some how to’s and some inspiration on how I want to do mine. I started getting obsessed with DIY blogs and discovered some really great blogs. One of my favorite is Pretty Handy Girl. What’s great about PHG is she is a local and her blog is very informative. Her B&B tutorial really helped me to start on mine and it helped out a lot! I learned a lot of great techniques from her. From caulking to painting, PHG gave me the encouragement to just go for it.

I wish I had the really before pic with the builder white and really nothing going on in this bathroom. But I just recently started blogging and before then I painted my bathroom the color that I wanted. So we are going to start here.

Firstly, I determined how high I wanted the board and batten to go up the wall. I wanted it pretty tall. I think there is a formula for this but I just eyeball how tall I wanted it to go. Used my really long level to make a straight level line on the wall and made sure each wall that will have the B&B was level to that line. Then I started the priming. I used Bulls Eye 123 to prime the walls. I think it took about 3 coats to prime. The blue/grey color on the wall was I guess pretty dark and needed that many coats. Once the walls were primed, then I started on taking measurements and cutting the wood for the B&B. Now this is the first time I’ve ever used a miter saw and my nail gun and compressor. I read all the instructions like several times and was really nervous and afraid I was going to cut my fingers off and shoot myself in the leg or hand with the nail gun. LOL!!! But I started to gain some confidence and got comfortable with both tools and started to really gain some speed when putting up the boards.


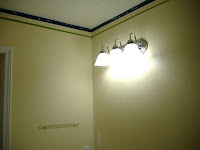
It felt like it took forever to put up the boards, caulk all the seams and the dents and nail holes, sanding and to paint and prime them. There was ALOT of painting going on. Eventually, I got to the point of the final coat of paint. I choose Valspar White on White. It’s like a nice soft but bright white. I think the blue/grey color of the walls really pop now.

After everything was painted and done. I put up my towel bars and the glass shelf I got awhile back on clearance at Target. I also painted my bathroom builder grade cabinet. It makes the bathroom look so much better. I want to eventually get some hardware on it, but want to find something special and vintage. Also, I have a bathroom shelf and basket thing I got when I moved in to hold more stuff. I really want like a white wood cabinet but those things are expensive. So Twin Ninja suggested we cover it with fabric and put sticky Velcro so it will hold up the fabric and I can get to my stuff easily. We found a clearance shower curtain at Walmart that was perfect for it. It also added some more color to the bathroom as well. Ninjagrl got on it and made it for me. It turned out great! Thanks Big Sis! :)
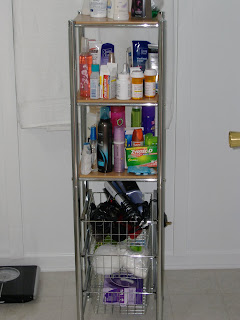


I wish I had a better camera so that you will really see the colors in this room but maybe for Christmas we will get one. :) Also excuse the pic with my toiletries and stuff. :P

Overall, it was a good experience and I learned a whole lot from it. I will definitely put up the B&B again. I want to do my bedroom almost the same way. I really love the comfy country look and that's the direction I'm going for my bedroom. I got alot of tips and help from friends and of course PHG and other sites. My bathroom is not quiet finish as I want to redo the floor and put up some accessories. I will definitely post pics of the final reveal. :D

I hope you enjoy and if any questions just let me know. How does it look? Like or dislike? lol..

P.S.. I dunno what is up with the font on this post.. hahah..

Sunday, September 18, 2011

Changes for the fall!!

So September 23 is the start of the fall season and I don't know about you but I'm very much looking forward to it. It seem like this summer and even spring was the hottest yet that I've ever experience. I'm ready for cooler football weather! ;)

So the first thing I did was cut my hair. LOL!! Now if you know me or seen the pic in header of the blog, I had really long hair. It was almost to the small of my back. I got really, really, really, tired of it. It was a battle every morning to comb out the knots and to just put it in a pony tail. So last Friday I decided to go get it cut off. I went to JC Penny salon cause I saw a ad for haircut and style for only $20. I told them I wanted to cut off about 10 to 12 inches to donate to Locks of Love. The ladies there were absolutely amazed at how long my hair was and happy I was donating it.

The hairstylist, Jackie, put my hair in a ponytail and measured and proceed to start hacking away. After it was cut off, my head felt lighter and free. lol.. I felt like I lost 5 pounds. She then shampooed and rinsed and started cutting some more off and shaping how I want it. Jackie really took her time and getting it right. I love it. It's still kinda long but not as long as it was before.

Shorter hair. teehee.. :)


I love the fall season!

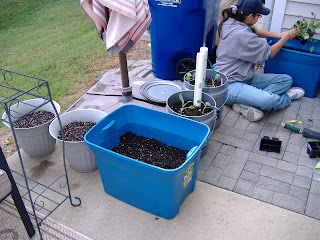
So for the next change for fall.... is... fall planting! The Twin Ninja and I started planting fall vegetables in our small container patio gardening. This year is the first year that we tried growing our own vegetables. We did alot of research on container gardening and our spring/summer crop we produced alot of cherry tomatoes, better boys tomatoes and roma's. Lots of cayenne peppers, cucumbers, squash and zucchini, beans, okra and alittle bit of strawberries (although the birds and rabbit ate those.) We also had two small herb containers as well with lots of rosemary, basil, mint, and sweet basil. Even with a small garden, we ran into alot of issues and problems with disease, insects and whatnot's eating our plants. :(

So for the fall, we are planting, carrots, lots of various lettuces, cabbage and collards. :) Wish us luck!


We still have some peppers growing as well. :D Also, picked up some pretty flowers to plant.

Until next time! :)


Friday, September 9, 2011

This what a ninja does to a bathroom

NinjaGrl here to blog about my new bathroom. So recently, I took time off from my job to relax and revamp my bathroom. Relax?! HAHAHA! I actually wanted to redecorate many other rooms that week but wow, who knew it would take all week just for the bathroom.

I had painted my bathroom a long while back and now those colors are just tired and dated. It was a yellowish beige and I painted a horrible boarder of blue and green at the top of the walls and it was crapply done. So a change was needed! Badly!!


before

Inspiration came from a shower curtain I got from Ikea!!(luv it) It has a lot of bright colors and a nice design. I kept many of the items in the bathroom just refreshed them.
The wall color was a mix of a blue we painted in the kitchen with a grey/blue my sis painted her bathroom with. It was all leftover paint, so I saved $$ using it and it turned into a great color!! Really matched the curtain and is flexible for future changes I can make.

So beside painting the walls, I painted the over-the-toilet cabinet a bright Island Orange. Orange is my favorite color. So it makes a ninja happy! It is also one of the colors in the curtain and I feel it adds interest and a pop of color in the space.

I added a new shower curtain rod. One that curves out to make my shower stall feel bigger and its a double rod. I can hang clothes to dry or towels on the outer rod! By the way, It was really hard installing it by myself. Many curse words and praises could be heard.

To finish the space, I added a basket with some towels(orange), mason jars with flowers and hung the same pictures up. I got some acrylic bathroom containers from the Container Store and a blue rug from Ikea to finish it out.

What I learned from this project:

(1)When sanding anything; walls, furniture, etc.
Use a mask.
(2)When spray painting anything.
USE A MASK.
(3)Make sure your painting in a well ventilated area and not in direct sunlight or high heat.
(4)Patience is a virtue. Take your time painting and sanding between coats. It will look professional in the end.
(5)A good brush is worth its weight in gold!
(6)Use your own stuff, no need to buy all new accessories unless you need to.
(7)Bring a friend. Have fun!
USE A MAAASKKKK!!!
I really like the new bathroom it looks fun, fresh and shows a ton of personality.

Savings
...mixed my own paint from leftovers
...shopped in clearance and reused items
...we already had a lot of paint supplies
...Have a budget and stick to it.

Here are some of the finished pics!


If anyone has any specific questions on how I did it, just ask!
Thanks!

NinjaGrl...out!

Monday, August 29, 2011

In da beginning.....

So yea.. I've been sucked into blogging now. My twin ninja and I decided to start a blog about all various things that is happening. Be it about diy stuff or the antics of our beloved pets. I hope you enjoy our little blog. :P